一、查看alloc流程
编译一份objc_756的源码工程,在当前工程中创建自定义类,FLYPerson,代码如下:
1 |
|
1 |
|
在main.m函数中
1 |
|
将断点设在[FLYPerson alloc]这一行,运行程序,等断点来到此处,依次在NSObjcet.mm以下几处添加断点
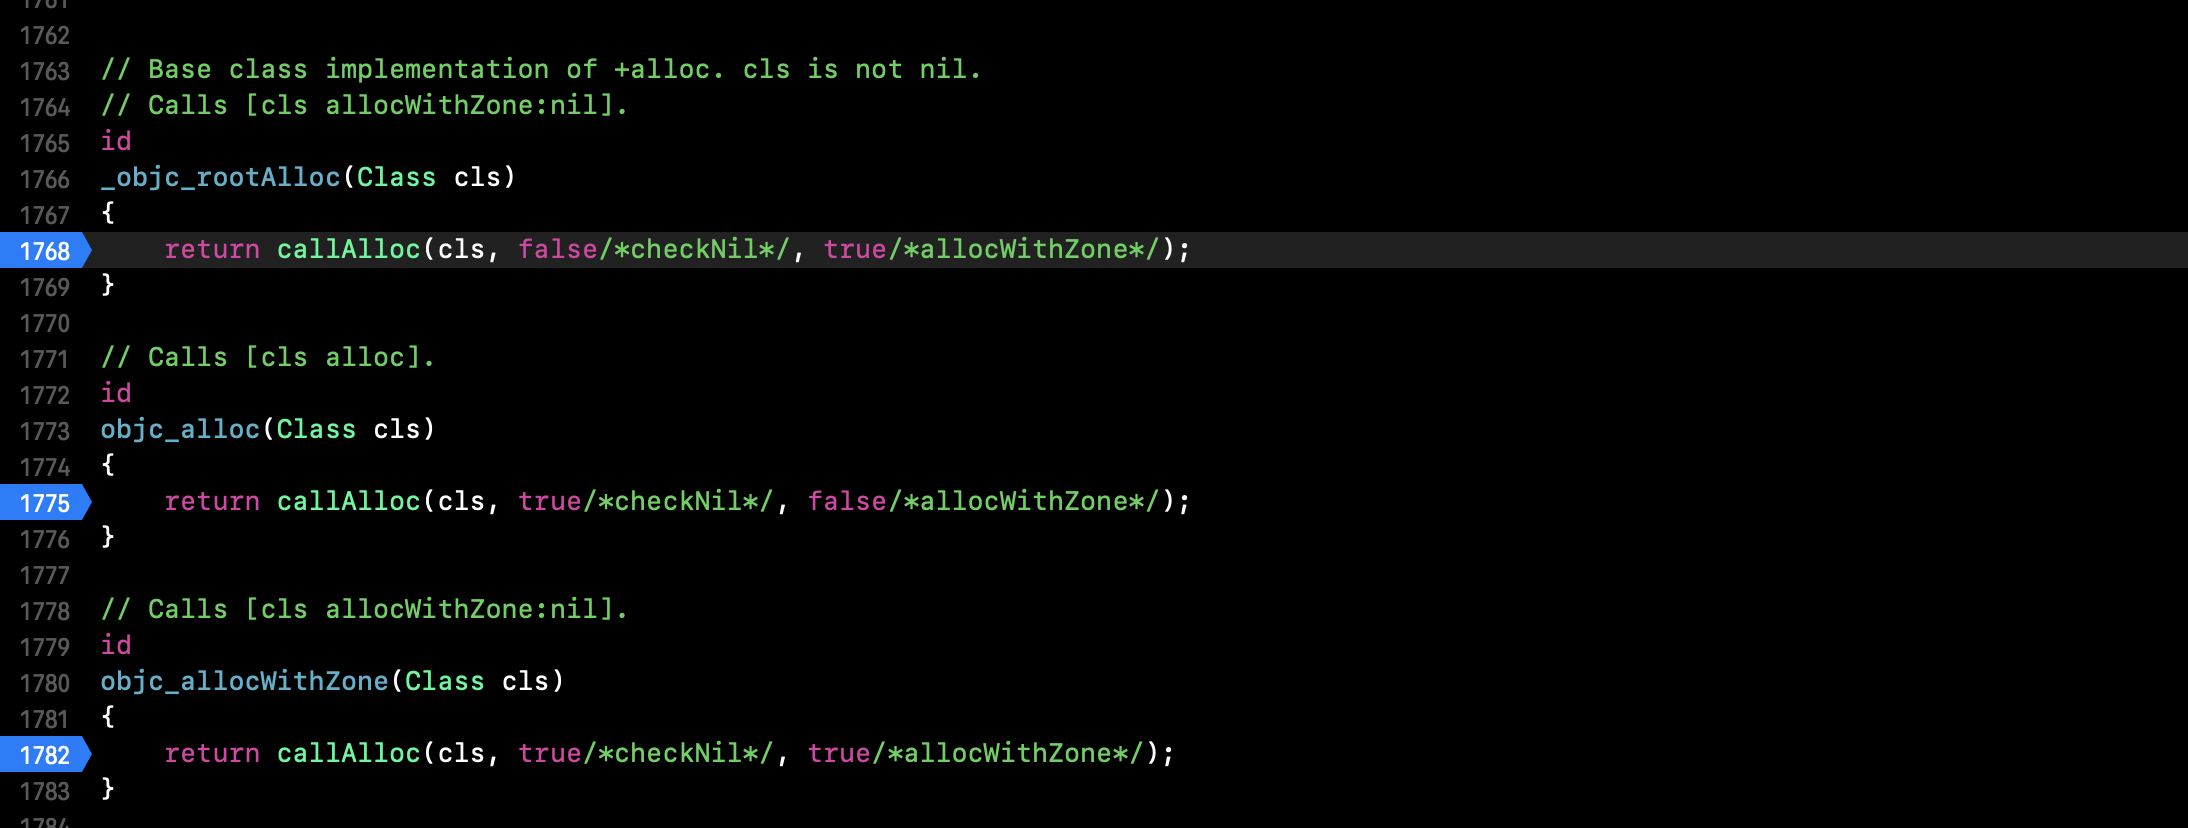

此时点击下一步,会发现,代码走到
注意这里的参数,true和false,会影响到后面的代码走向。(LLVM做的一个优化,验证方法等有时间另开一篇文章讲述)
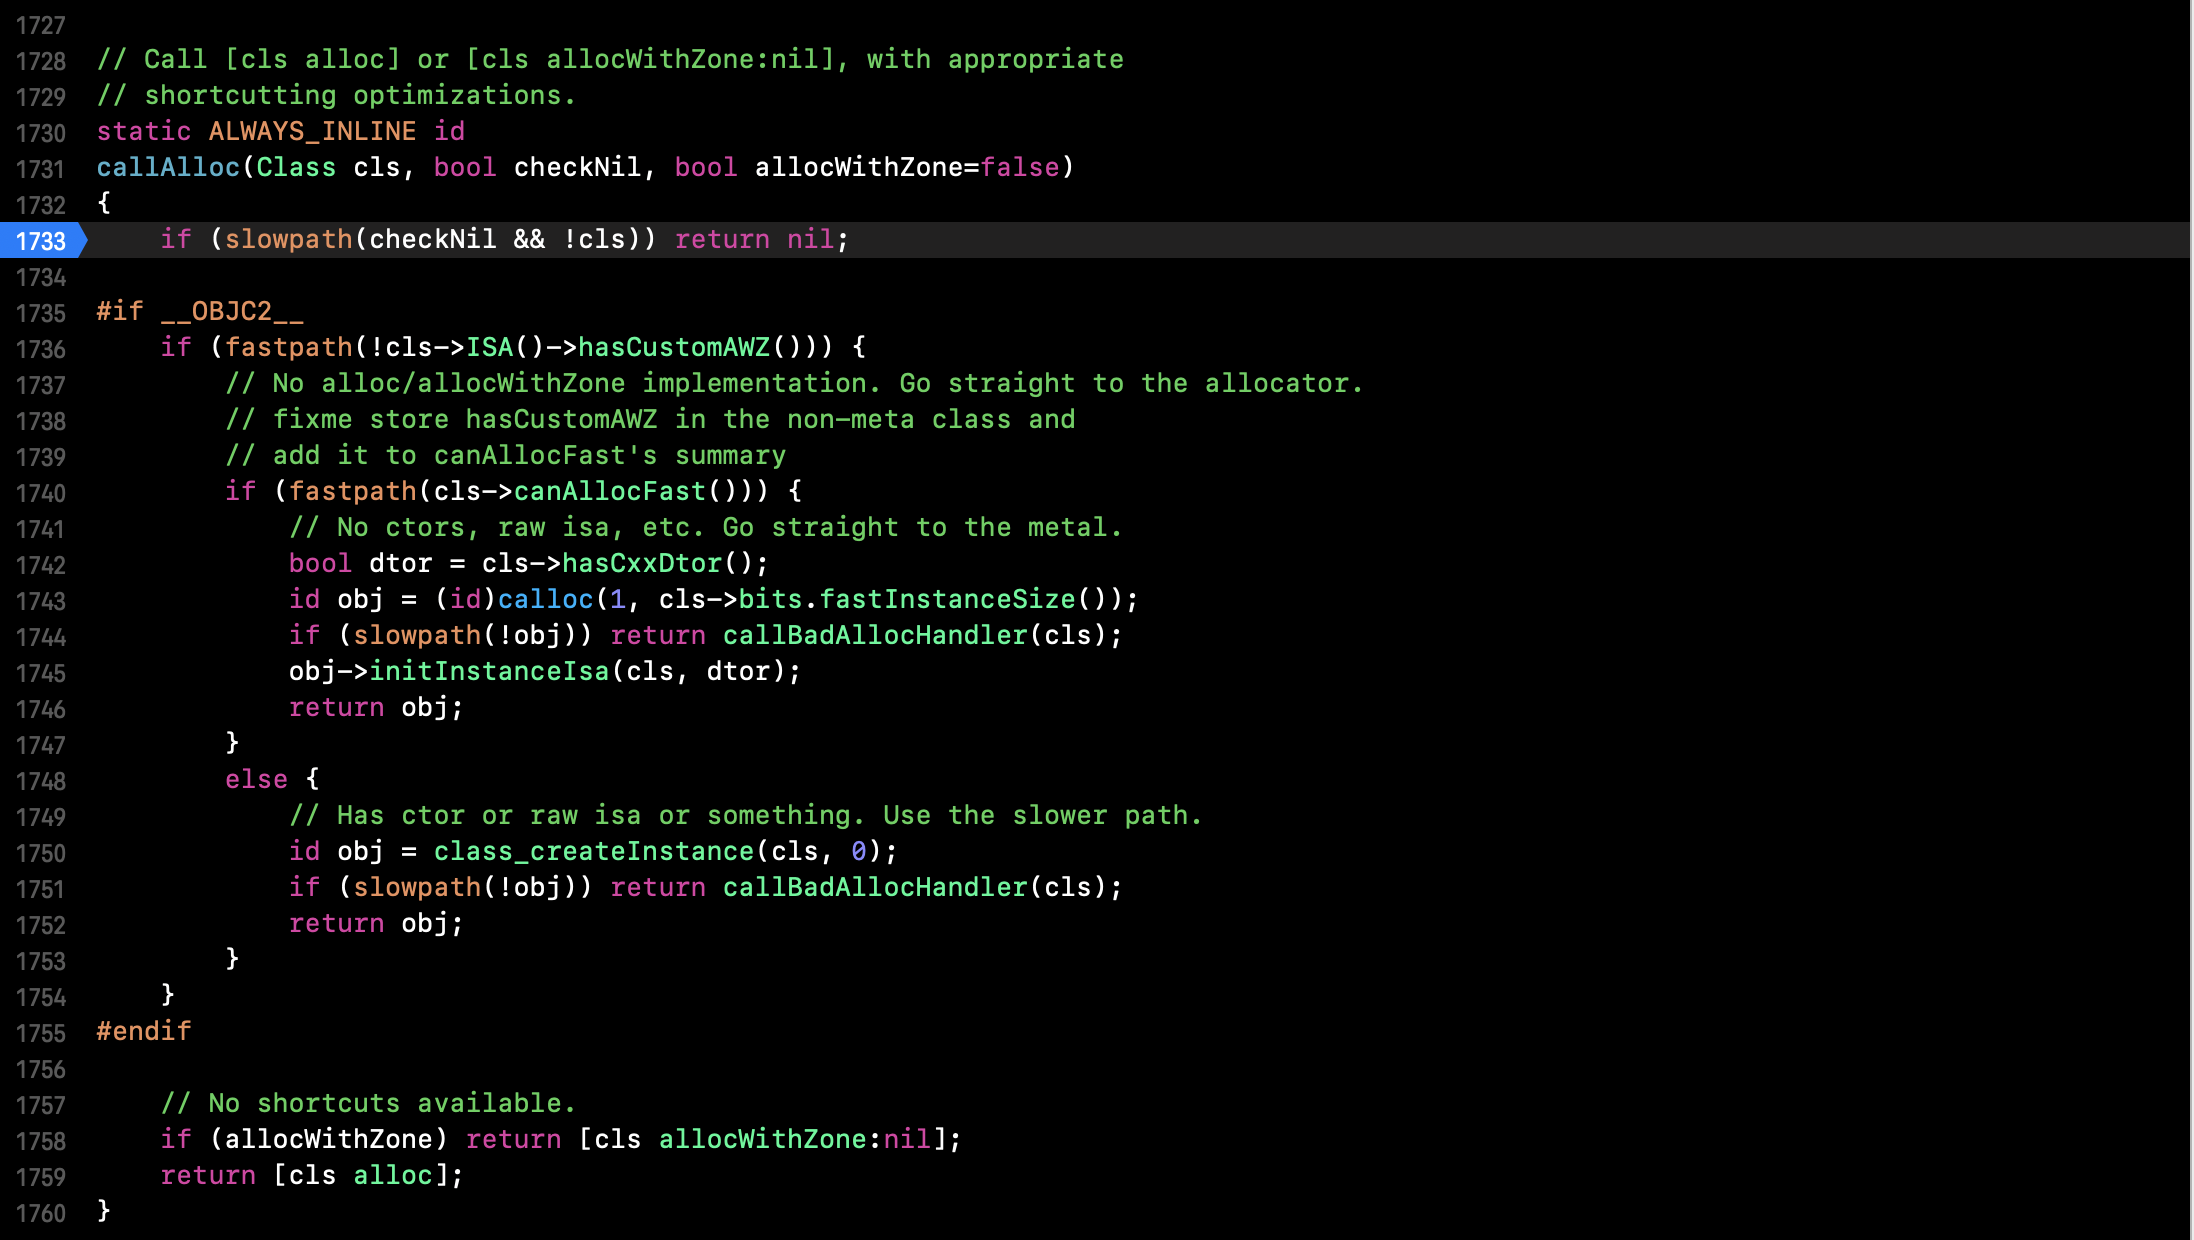
继续下一步,来到了断点列表4图中的callAlloc
- cls->ISA()->hasCustomAWZ() (检测该class是否有allocWithZone方法)此时为true
最后会来到断点列表4图中1759这一行代码,继续下一步会走到断点列表3中的方法,继续下一步,依次经过_objc_rootAlloc,又来到了callAlloc,此时参数为false和true;
- 如果此时FLYPerson中重写了allocWithZone方法,会走到1758行[cls allocWithZone:nil]中
- 如果此时FLYPerson中未重写allocWithZone方法,会来到1740行if (fastpath(cls->canAllocFast()))
注意:
- cls->canAllocFast() 永远为false,可以comm点击去查看,最后是根据宏定义FAST_ALLOC是否定义,如果未定义,则返回false,查看FAST_ALLOC定义除,为写死的1,永远不定义FAST_ALLOC
最后来到了如下代码:
1 | id obj = class_createInstance(cls, 0); |
继续,走进class_createInstance
1 | id |
继续会走到calloc->initInstanceIsa,最后返回。
这里的calloc需要编译另一个工程区查看,initInstanceIsa是初始化一些参数。
最后附上一张整体流程图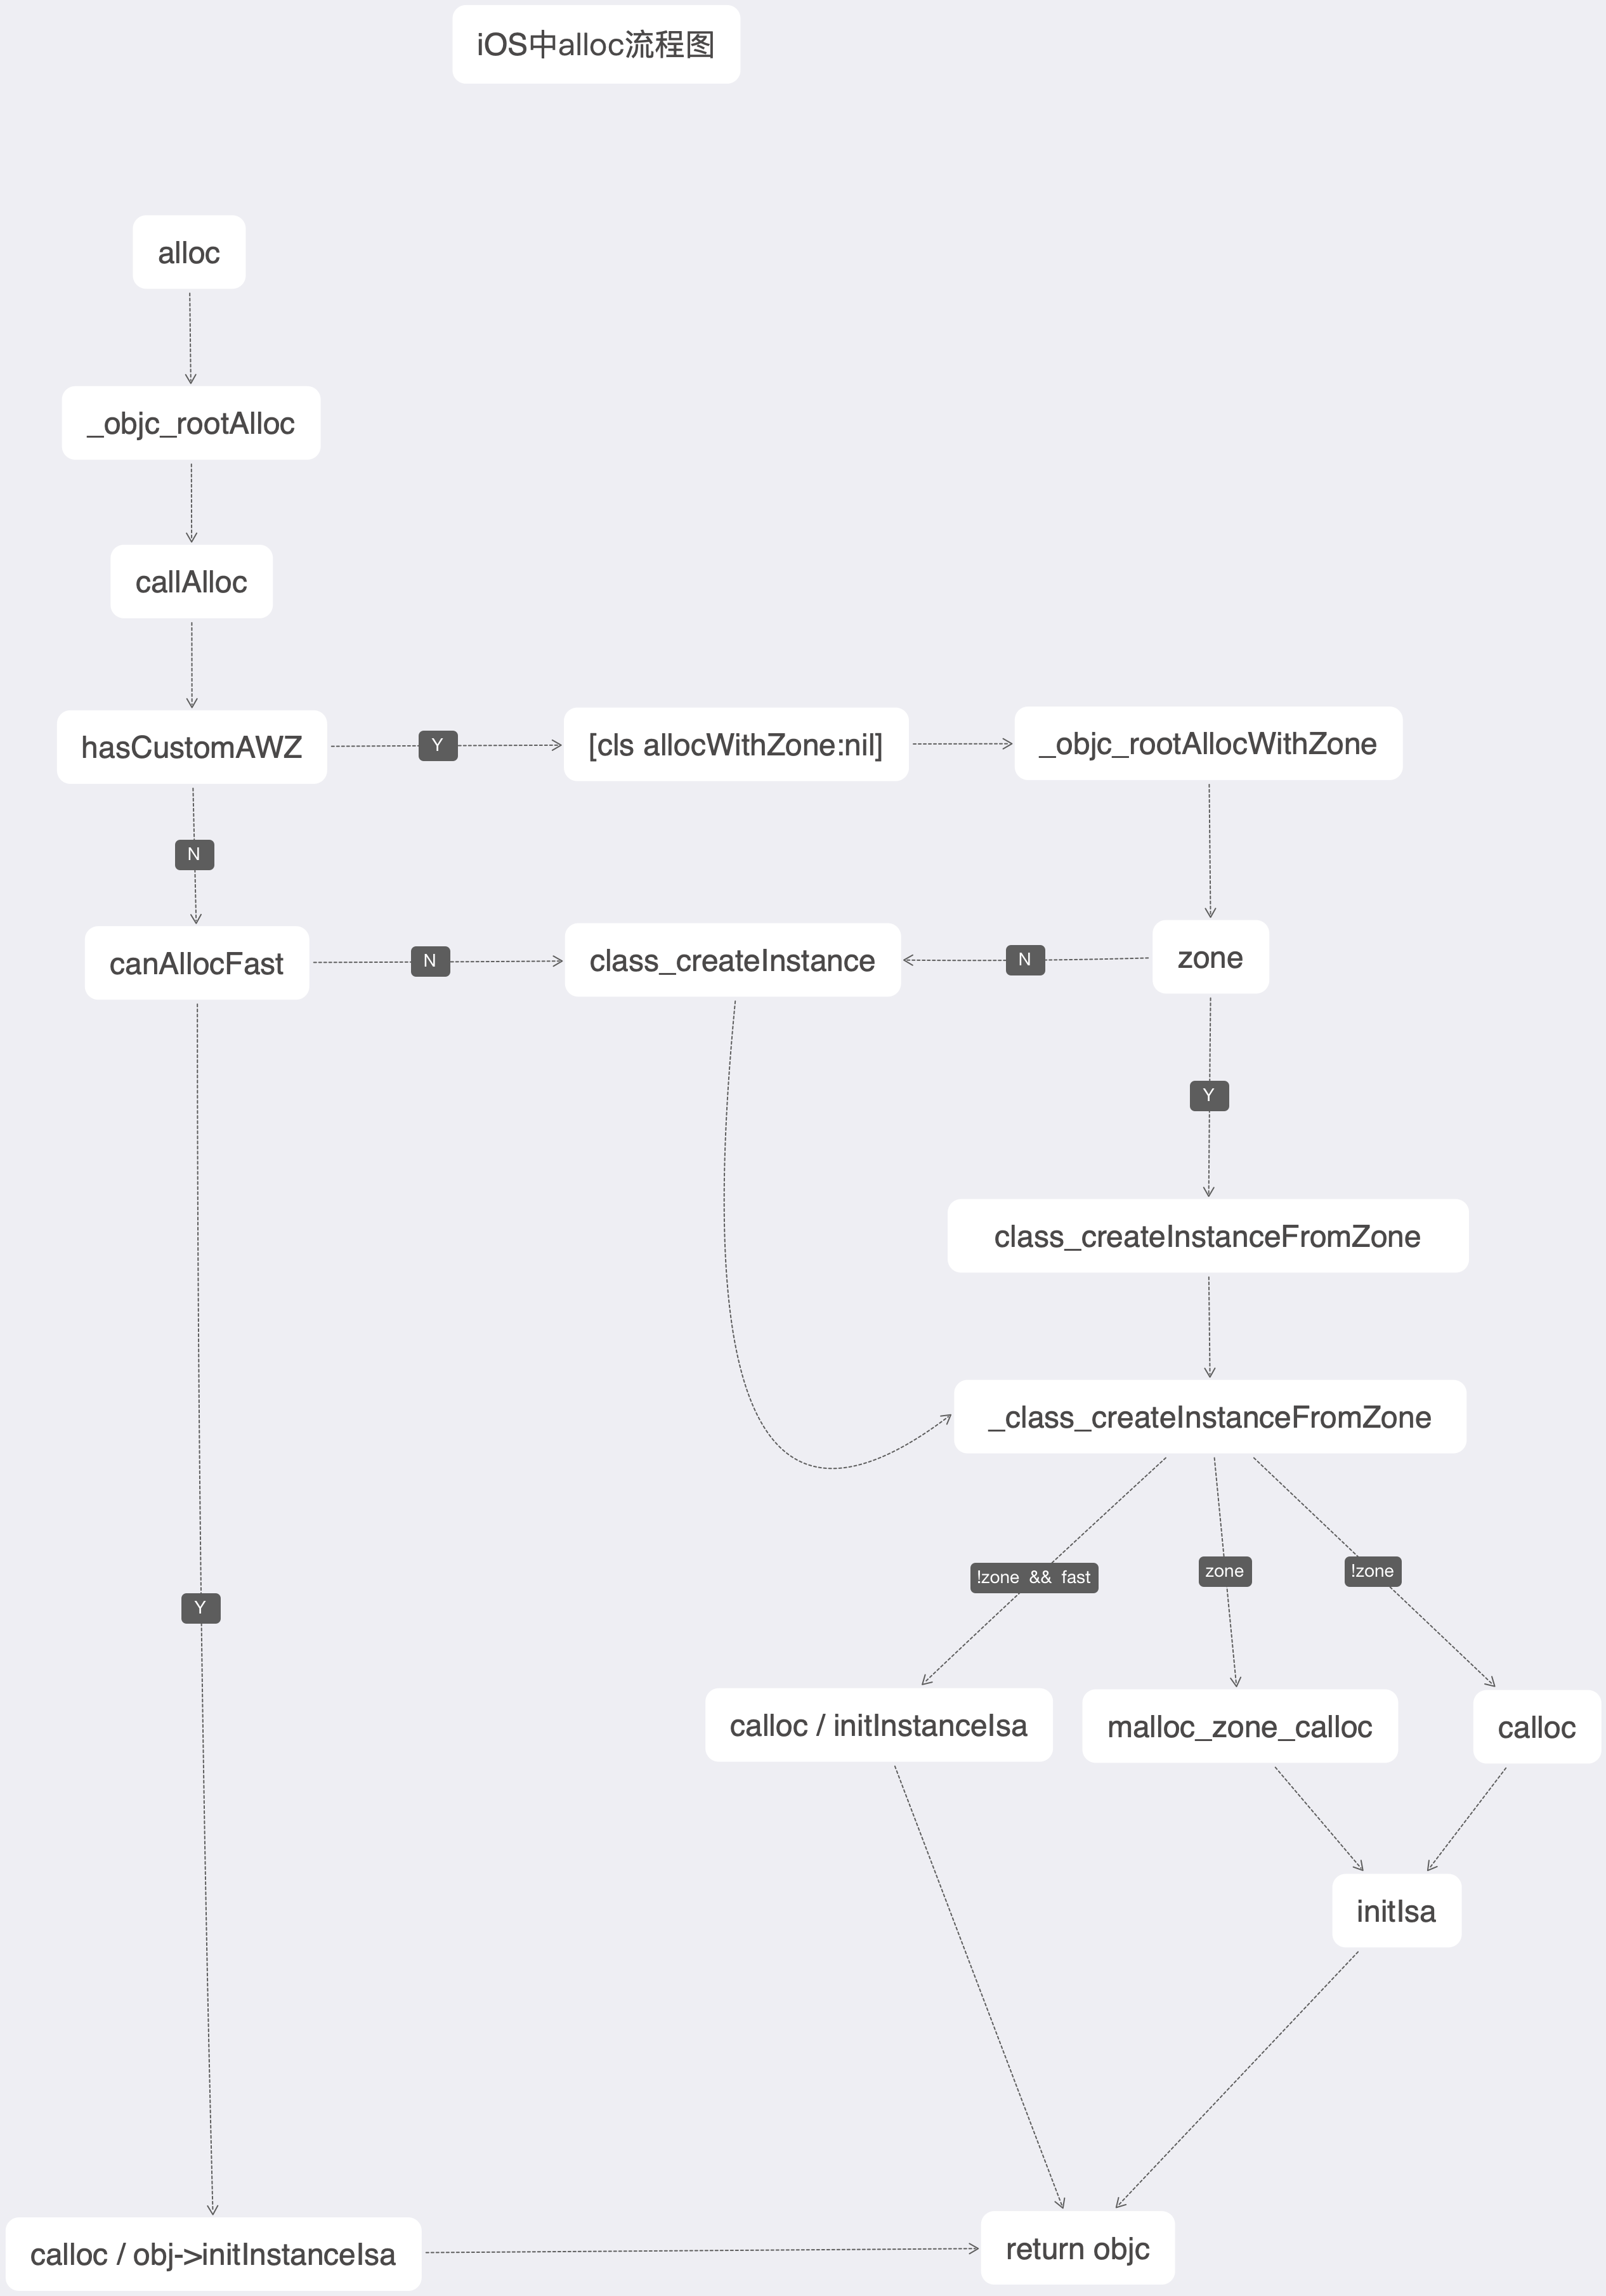
二、内存对齐
三条原则:
- 1、数据成员对齐原则:
结构(struct)(或联合体(union))的数据成员,第一个数据成员放在offset为0的地方,以后每个数据成员存储的起始位置都要从该成员大小或者成员的子成员中占位最大(只要该成员有子成员,比如说是数组,结构体等)的整数倍开始(比如int为4个字节,则要从4的整数倍地址开始存储)。 - 2、结构体作为成员:
如果一个结构里有某些结构体成员,则结构体成员要从其内部最大元素大小的整数倍地址开始存储。(struct a里存有struct b,b里有char,int,double等元素,那b应该从8的整数倍开始存储)。 - 3、最后
结构体的总大小,也就是sizeof的结构,必须是其内部最大成员的整数倍,不足的要补齐。
demo代码:
1 | NS_ASSUME_NONNULL_BEGIN |
1 |
|
log:
2019-12-28 11:47:32.964555+0800 FLYTest[6129:619837] 24 - 16
2019-12-28 11:47:32.965017+0800 FLYTest[6129:619837] 40 - 48
小结:
- 至于结构体的大小,利用上面的三原则,以及结构体后面的注释,很容易解释。
- 对于oc中的对象,系统已经自动为对象的属性进行了最小内存占用排序,以减少内存占用。class_getInstanceSize获取class的内存占用,malloc_size获取系统为对象开辟的空间大小,可以看到系统为对象开辟的大小比对象实际占用大小大,这样做是为了安全考虑。
这里需要查看calloc流程,通过上述过程,可以看到在calloc的时候,参数分别为1,40;
此时需要另外搭建一个libmalloc工程,在main函数中用以上参数,调用calloc函数。
1 |
|
此处应该一直点击下一步,因为内部代码有一个递归,在递归过程中,zone->calloc重新进行了指向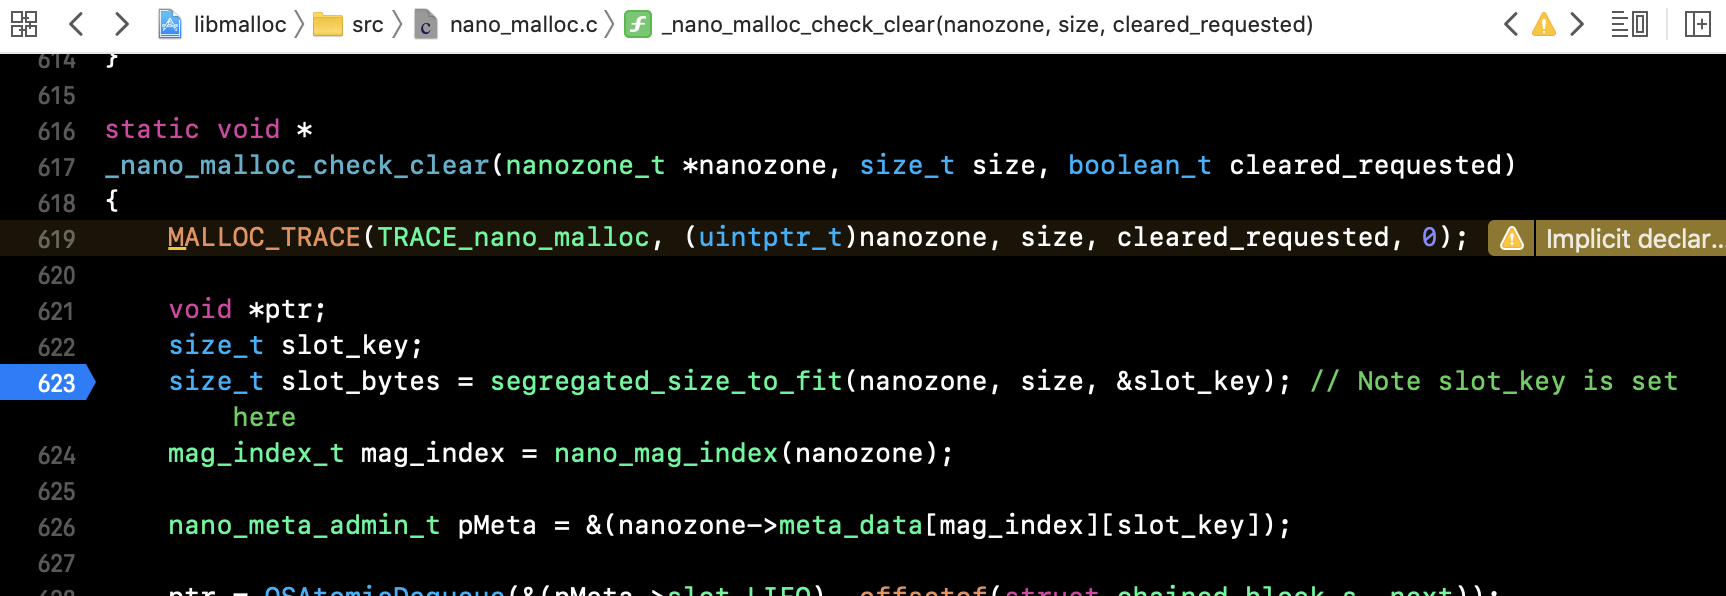
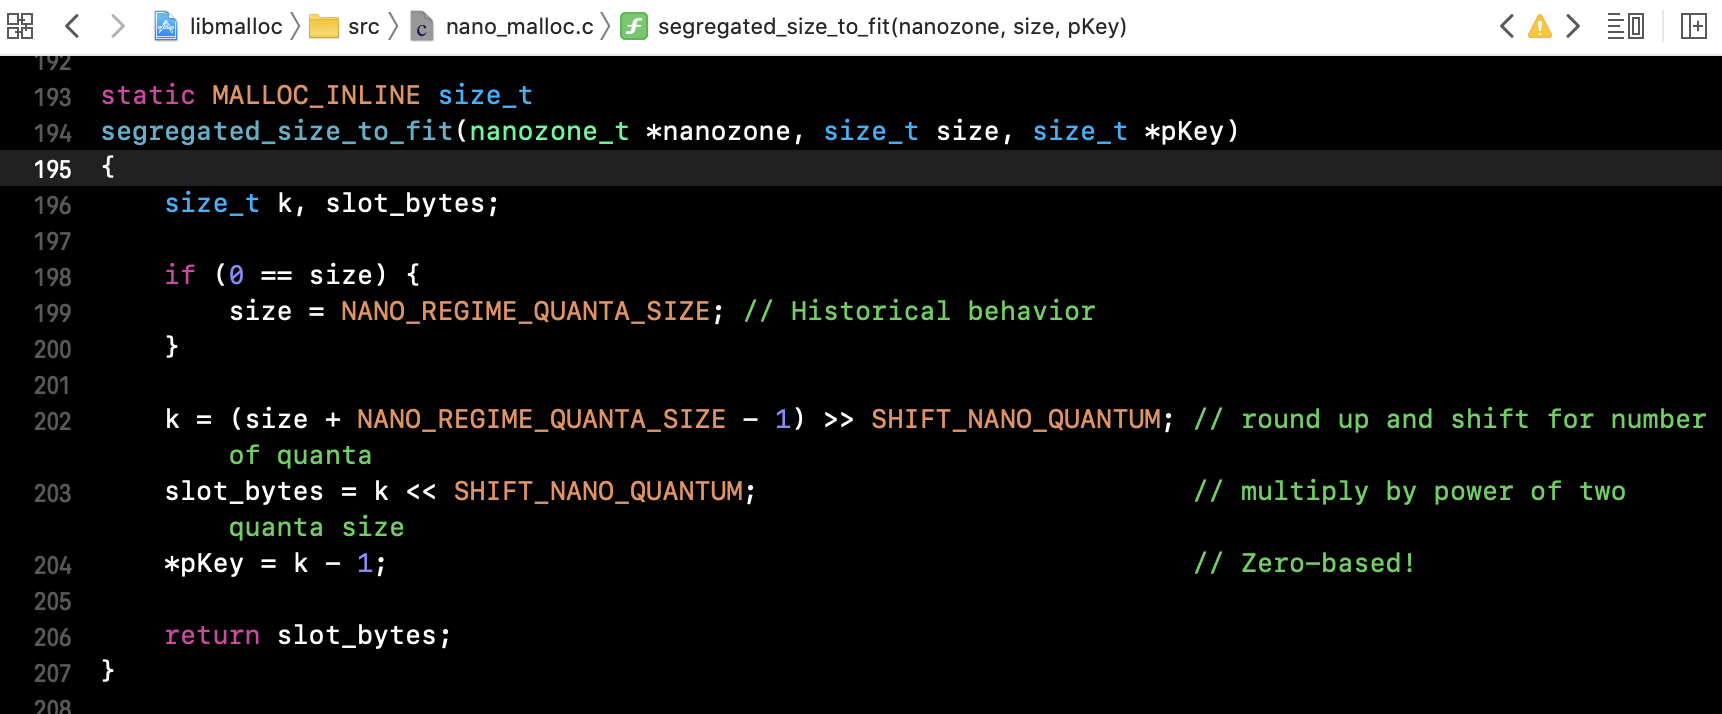
上图中SHIFT_NANO_QUANTUM宏定义是4,可以看到其实就是16位对齐,得出malloc_size是16位对齐的方式开辟空间。
三、ISA
isa中存储着对象的属性,方法,类信息和引用计数等信息,可以说是一个对象的灵魂所在。
看一下创建ISA的入口:
1 | inline void |
ISA的结构:
1 | union isa_t { |
ISA_BITFIELD
1 | # if __arm64__ |
可以看到arm64中,1 + 1 + 1 + 33 + 6 + 1 + 1 + 1 + 19 = 64位,刚好8字节,x86同理。
注释:
- nonpointer : 表示是否对isa指针开启指针优化,0:纯指针,1:不止是类对象地址,isa中包含了类信息,对象的引用计数等。
- has_assoc : 关联对象标志位,0:没有,1:存在
- has_cxx_dtor : 该对象是否有 C++ 或者 Objc 的析构器,如果有析构函数,则需要做析构逻辑, 如果没有,则可以更快的释放对象
- shiftcls : 存储类指针的值。开启指针优化的情况下,在 arm64 架构中有 33 位用来存储类指针。
- magic :用于调试器判断当前对象是真的对象还是没有初始化的空间。
- weakly_referenced : 标志对象是否被指向或者曾经指向一个 ARC 的弱变量,没有弱引用的对象可以更快释放。
- deallocating : 标志对象是否正在释放内存。
- has_sidetable_rc : 当对象引用技术大于 10 时,则需要借用该变量存储进位。
- extra_rc : 当表示该对象的引用计数值,实际上是引用计数值减 1, 例如,如果对象的引用计数为 10,那么 extra_rc 为 9。如果引用计数大于 10, 则需要使用到下面的 has_sidetable_rc。
总结:
isa中重要的信息都存放在shiftcls中,怎么快速获取shiftcls,就是用上面提供的掩码ISA_MASK,用掩码与isa进行与运算,结果就是shiftcls。
扩展:
这里用了位,比我们平常用的int和bool值快很多,因为位数少了很多,比如int占4个字节,arm64中就是4 * 8 = 32位,浪费了很多空间,同样效率也降低了。
最后放一张isa流程图: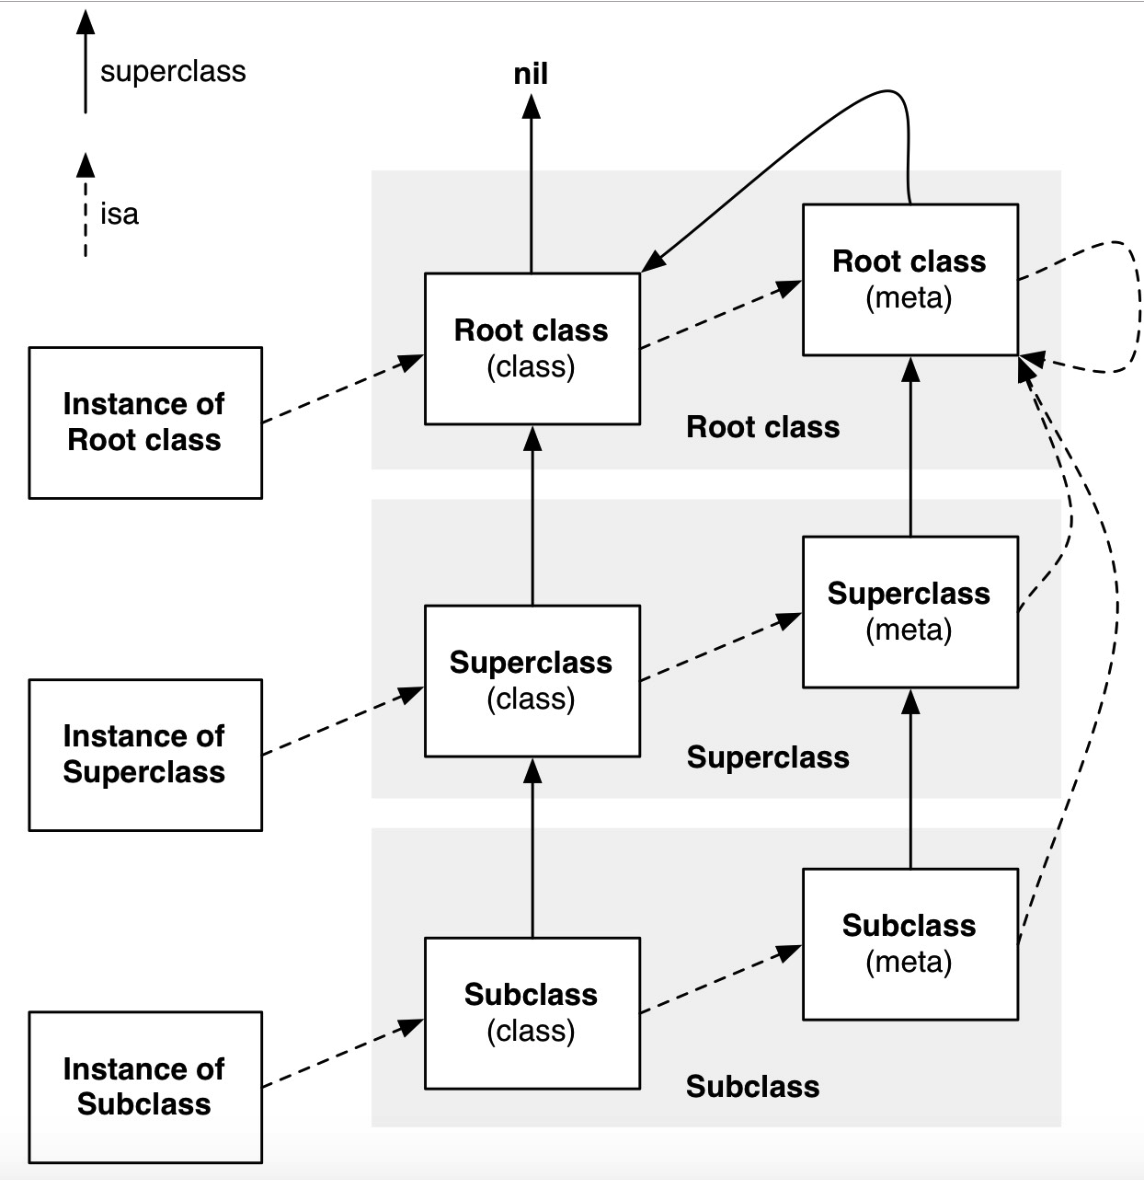
总结:
- 对象的isa是类(类对象在内存中只有一份),类的isa是其元类,该元类的isa是NSObject的元类。NSObject的元类的isa是其自身。
- 元类的父类是该类的父类的元类。NSObject的元类的父类是NSObject类。NSObject类的父类是nil。
🔍 核心逻辑:isa_t如何”存储”指向
isa_t的核心,就是用shiftcls字段存储类对象的地址。这个地址被编码后存入,再通过特定的掩码(ISA_MASK)解码取出。这个过程可以拆解为几步:
地址编码:在设置
isa时,系统会把类对象的地址右移3位,然后存入shiftcls字段。右移是为了舍弃地址末尾无用的0,以节约存储空间【6†L27-L28】。位域存储:这个”压缩后”的地址,就保存在
isa_t联合体中的shiftcls位域里。而isa_t本身只是占据64位内存的一个普通变量。标志位开启:
isa_t结构体中的nonpointer标志位会被设为1,这标志着当前的isa是一个Non-Pointer ISA,其中的shiftcls字段有效。地址解码:当运行时需要获取对象的类时,它会将
isa_t整体的64位二进制值bits与ISA_MASK进行按位与运算。ISA_MASK是一个精心设计的掩码,在位运算后只保留下shiftcls字段的值,得到类对象在内存中的实际地址。整个过程无需引入额外的指针变量。
💻 源码验证:初始化与取值的过程
为了更清晰地理解,我们可以看一眼runtime源码中简化的逻辑:
1. 初始化时设置 isa (编码)
类地址cls在传给initIsa后,通过右移3位存入shiftcls字段。
1 | newisa.shiftcls = (uintptr_t)cls >> 3; // 将类地址编码后存入shiftcls |
2. 取值时获取类 (解码)
当需要获取类地址时,调用ISA()方法,将bits与掩码ISA_MASK进行按位与运算,直接还原出类地址。
1 | return (Class)(isa.bits & ISA_MASK); // 通过掩码解码,取出类地址 |
🧭 理清概念:Class 与 isa_t
你可能注意到,objc_class 结构体继承自 objc_object,而后者正是包含 isa_t 的地方。为了让你对比更直观,可以看下面这个简化的代码对比图:
1 | // 旧版: 指针直接指向 |
总结来说,你可以简单理解:
- 未优化时(
nonpointer=0):isa就是一个指向类对象的Class指针。 - 优化后(
nonpointer=1):isa本身不再是指针,而是将类地址压缩编码后作为普通数据存进shiftcls字段;需要时再解码取出。superclass指针仅用于类继承链查找,与isa链是两条不同的路径。这样,单条isa链通过在不同层级编码不同地址,串起了实例→类→元类→根元类的关系。