这是一份基于源码整理的关于 iOS 中类(Class)底层原理的技术文档,希望能帮你更深入地理解其设计思想。
iOS 底层探索系列:类的本质 在 Objective-C 中,Class 是一切对象的蓝图,但我们看到的 @interface 和 @implementation 只是表层语法。在这篇文章中,我们将借助 objc4-756 的源码,一步步拆解 Class 在运行时究竟是什么。
探索准备 要真正理解 Class,就需要深入到 objc4 源码中。你可以从这里获取苹果开源的官方源码:apple-oss-distributions/objc4 。在分析前,也需要掌握一些基础的 LLDB 指令:
1
2
p/x # 以16进制格式打印当前对象 x/4xg # 以16进制格式,读取当前对象的首地址,并向后读取4段64位内存
一、利用 Clang 重写 .m 文件,探寻类的本质 我们可以通过一个简单的例子来探究这个问题。声明并实现一个 FLYPerson 类,它继承自 NSObject,拥有一个实例变量 hobby,一个属性 nickName,以及几个实例方法和类方法。
1 2 3 4 5 6 7 8 9 10 11 12 13 14 15 16 17 18 19 20 21 22 23 24 25 26 27 28 29 30 NS_ASSUME_NONNULL_BEGIN @interface FLYPerson : NSObject NSString *hobby; } @property (nonatomic , copy ) NSString *nickName;- (void )sayHello; - (void )sayByeBye; - (void )sayGoGo; + (void )sayHappy; @end NS_ASSUME_NONNULL_END @implementation FLYPerson - (void )sayHello { NSLog (@"FLYPerson say : Hello!!!" ); } - (void )sayByeBye { NSLog (@"FLYPerson say : ByeBye!!!" ); } - (void )sayGoGo { NSLog (@"FLYPerson say : GoGo!!!" ); } + (void )sayHappy { NSLog (@"FLYPerson say : Happy!!!" ); } @end int main(int argc, const char * argv[]) { @autoreleasepool { FLYPerson *person = [[FLYPerson alloc] init]; Class pClass = object_getClass(person); NSLog (@"person对象:%@, 类对象地址:%p" , person, pClass); } return 0 ; }
Clang 重写指令 使用 Clang 命令将 main.m 重写为 C++ 文件,可以让我们一窥 Objective-C 底层的真实面目。
对于包含 UIKit 等动态链接库的代码,编译指令需要更详细:
1
2
3
4
5
6
7
8
9
10
11
# 基础重写 clang -rewrite-objc main.m -o main.cpp # 包含依赖库的重写 clang -rewrite-objc -fobjc-arc -fobjc-runtime=ios-13.0.0 -isysroot /path/to/iOS.sdk main.m # Xcode 路径下的指令 # 模拟器 xcrun -sdk iphonesimulator clang -arch arm64 -rewrite-objc main.m -o main-arm64.cpp # 真机 xcrun -sdk iphoneos clang -arch arm64 -rewrite-objc main.m -o main-arm64.cpp
类在底层是一个结构体指针 打开重写后生成的 .cpp 文件,在 main 函数中,我们看到 person 对象的创建过程被转换成了 C 函数调用:
很长的代码…这里就不贴了。
最关键的是文件顶部对 Class 的定义:
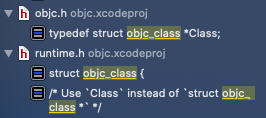
1 typedef struct objc_class *Class;
这引出了第一个结论:在 Objective-C 底层,Class 本质上是一个指向 objc_class 结构体的指针 。
二、深入 objc_class 源码 既然 Class 是 objc_class 结构体的指针,那么它的真实面目就在 objc-runtime-new.h 文件中。
精简后的 objc_class 结构如下:
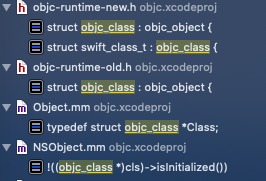
1
2
3
4
5
6
struct objc_class : objc_object { Class superclass; cache_t cache; class_data_bits_t bits; };
这个结构体揭示了类层次结构的基石:
继承自 objc_object :这说明了“万物皆对象”,因为 objc_class 本身也是一个对象(我们常说的类对象)。superclasscachebitsclass_rw_t 和 class_ro_t 就存储在其中。
objc_class 各属性的内存大小我们也可以计算一下 objc_class 结构体中各个属性占用内存的大小。
1
2
3
4
5
6
struct objc_class : objc_object { Class superclass; cache_t cache; class_data_bits_t bits; };
在 64 位环境下,通过编译器进行内存对齐之后,一个类对象实际占用的内存大小是 8(isa) + 8(superclass) + 16(cache) + 8(bits) = 40 字节。由于内存对齐的原因,其大小通常是 8 的倍数,即 40 字节。
1. isa 指针 objc_class 继承自 objc_object,而 objc_object 的结构非常简洁:
1
2
3
struct objc_object { Class _Nonnull isa; };
isa 指针是理解 Objective-C 对象模型的关键。它不仅仅是一个指向类对象的指针,还通过位域 (bitfield)技术存储了对象的引用计数和析构状态等额外信息,极大地优化了内存和性能。
2. cache_t cache cache_t 是类的方法缓存,为消息发送机制提供了高效的“快车道”。其结构大致如下:
1
2
3
4
5
6
struct cache_t { struct bucket_t *_buckets; mask_t _mask; mask_t _occupied; };
缓存过程 :当 objc_msgSend 通过慢速查找(遍历方法列表)找到 IMP 后,会将 SEL 和 IMP 以 bucket_t 的形式存储到缓存中。查找过程 :后续调用时,objc_msgSend 会优先在缓存中查找,如果命中(Cache Hit),可以直接跳转到 IMP 执行。哈希冲突 :当多个 SEL 映射到同一个数组下标时,系统会通过“开放寻址法”来解决冲突,即向前依次寻找空位或匹配项。内存大小 :经过计算,cache_t 结构体在64位环境下占用 16 字节的内存。随后,我们可以通过
3. class_data_bits_t bits bits 是 class_data_bits_t 类型,它将类的所有元数据,如方法列表、属性列表、协议列表等,都包裹在一个 uintptr_t 类型的 bits 位域中。要获取这些元数据,我们需要通过 data() 方法。
class_data_bits_t 的内部简化结构如下:
1
2
3
4
5
6
7
8
struct class_data_bits_t { uintptr_t bits; public : class_rw_t * data () return (class_rw_t *)(bits & FAST_DATA_MASK); } };
FAST_DATA_MASK 是一个掩码,通过与 bits 进行 & 操作,可以提取出指向 class_rw_t 的指针。那么,这个 class_rw_t 里又有什么呢?
class_rw_t 与 class_ro_tclass_rw_t 结构体包含了类在运行时可以被修改的信息,以及指向只读信息的指针。
class_rw_t 的简化结构如下:
1
2
3
4
5
6
7
8
9
10
11
12
13
14
struct class_rw_t { uint32_t flags; uint32_t version; const class_ro_t *ro; method_array_t methods; property_array_t properties; protocol_array_t protocols; Class firstSubclass; Class nextSiblingClass; };
ro (class_ro_t)
class_ro_t 的简化结构如下:
1
2
3
4
5
6
7
8
9
10
11
12
struct class_ro_t { uint32_t flags; uint32_t instanceStart; uint32_t instanceSize; const char *name; method_list_t *baseMethodList; protocol_list_t *baseProtocols; const ivar_list_t *ivars; const uint8_t *ivarLayout; property_list_t *baseProperties; };
通过 LLDB,我们可以验证这个层次结构。在 main 函数中,我们可以通过 pClass 地址偏移计算出 bits 的地址,并一步步探索内部的 ro 数据。
上图是 class_data_bits_t 结构,我们可以通过 ro 看到类的最终信息。
三、从 class_rw_t 到 method_t 方法的底层实现,就藏在 class_rw_t 的 methods 和 class_ro_t 的 baseMethodList 中。它们共同构成了一个可以动态扩展的二维数组结构。
1. method_array_t 与 method_list_t class_rw_t 中的 methods 是一个 method_array_t 类型,它是一个二维数组,包含了一个或多个 method_list_t。为什么要设计成二维的呢?
这是因为一个类的方法可以来自:
编译器本身 :我们写在 @implementation 中的方法。分类 (Category) :通过分类动态添加的方法。
method_array_t 能够将来自不同源(主类和多个分类)的方法列表(method_list_t)拼接在一起,形成一个统一的方法列表。
2. method_t 而 method_list_t 中的每个元素,都是一个 method_t 结构体,它封装了一个完整的方法信息。
1
2
3
4
5
struct method_t { SEL name; const char *types; IMP imp; };
SEL (方法选择器)SEL 对应不同的方法。在 Runtime 中,SEL 通过字符串比较来寻找对应的 IMP。
IMP (方法实现)SEL 和 IMP,Runtime 就能根据方法名找到并执行对应的函数。
types (方法类型编码)
name"sayHello"。
types"v16@0:8" 表示一个返回 void,接收 id 和 SEL 作为参数的方法。其中,@代表 id 类型,: 代表 SEL。
imp
3. 获取类的所有方法 通过 class_rw_t 的 methods 方法,我们可以获取到类的方法列表。该列表是一个 method_array_t 类型的二维数组,其中包含了所有实例方法的 method_t 结构。
我们可以通过 LLDB 来验证前面声明的 FLYPerson 类中的方法:
1
2
3
4
5
6
7
8
9
10
11
12
13
14
15
16
17
18
19
20
21
22
23
24
25
26
27
28
29
30
31
32
33
34
35
36
(lldb) p methods.0.0 # 获取第一个方法列表中的第一个方法 (method_t) = { name = "sayHello" types = 0x0000000100000f8d "v16@0:8" imp = 0x0000000100000c90 (FLYTest`-[FLYPerson sayHello] at FLYPerson.m:12) } (lldb) p methods.0.1 # 获取第一个方法列表中的第二个方法 (method_t) = { name = ".cxx_destruct" types = 0x0000000100000f8d "v16@0:8" imp = 0x0000000100000d60 (FLYTest`-[FLYPerson .cxx_destruct]) } (lldb) p methods.0.2 # 获取第一个方法列表中的第三个方法 (method_t) = { name = "setNickName:" types = 0x0000000100000f9d "v24@0:8@16" imp = 0x0000000100000d20 (FLYTest`-[FLYPerson setNickName:] at FLYPerson.h:16) } (lldb) p methods.0.3 # 获取第一个方法列表中的第四个方法 (method_t) = { name = "nickName" types = 0x0000000100000f95 "@16@0:8" imp = 0x0000000100000cf0 (FLYTest`-[FLYPerson nickName] at FLYPerson.h:16) } (lldb) p methods.0.4 # 获取第一个方法列表中的第五个方法 (method_t) = { name = "sayByeBye" types = 0x0000000100000f8d "v16@0:8" imp = 0x0000000100000ce0 (FLYTest`-[FLYPerson sayByeBye] at FLYPerson.m:13) } (lldb) p methods.0.5 # 获取第一个方法列表中的第六个方法 (method_t) = { name = "sayGoGo" types = 0x0000000100000f8d "v16@0:8" imp = 0x0000000100000cd0 (FLYTest`-[FLYPerson sayGoGo] at FLYPerson.m:14) }
4. 获取类的成员变量 ivars 同样,通过 class_ro_t 的 ivars 方法,我们也可以获取到类的所有成员变量列表。在这个列表中,可以看到 .cxx_destruct 是编译器自动生成的析构函数方法,以及 nickName 属性的 setter 和 getter 方法。
四、分类(Category)与 class_rw_t class_rw_t 的设计,使得分类 (Category) 的功能成为可能。众所周知,分类可以在不修改原类的情况下,为其动态地添加方法。
加载 :当应用程序启动时,Runtime 会加载所有类和分类。附着的 :methodizeClass 是处理分类附着过程的关键函数。它接收一个 class_rw_t 和一个分类列表,然后遍历此列表,将分类中的方法、属性和协议分别添加到 class_rw_t 的 methods、properties 和 protocols 中。覆盖 :由于分类的方法会优先被添加到 methods 数组的前面,当原类和分类中存在同名方法时,Runtime 在查找时会先命中分类的方法,从而实现了对原类方法的“覆盖”。
五、realizeClass:类的加载与初始化 realizeClass 是类加载流程中的关键一步,它完成从“未实化类(unrealized)”到“实化类(realized)”的转变。简单来说,read_images 是类的加载初始化过程的起始点。这个过程可能分为以下几步:
分配空间 :为类的 class_rw_t 结构体分配足够的内存空间。处理继承链 :递归地确保父类和元类已经被实化,然后设置好 superclass 指针。处理元类 :与普通类类似,实化其元类并处理好继承关系。Attach Categories :调用 methodizeClass 函数,将所有与该类相关的分类(Categories)附着上去。
一个类在被首次使用 (例如,第一次向其发送消息)时,或者某些非懒加载类(如实现了 +load 方法的类)会在 _read_images 阶段就被实化。realizeClass 为类真正投入“使用”做好了最后的准备。
总结 通过对 objc_class 源码的层层剖析,我们可以发现 Objective-C 的类实现机制是一个巧妙而庞大的系统:
类的本质 :Class 是一个指向 objc_class 结构体的指针。数据分离 :class_rw_t(可读可写)与 class_ro_t(只读)的分离,使得分类和动态添加成为可能,同时保证了核心内存数据的稳定。方法缓存 :cache_t的存在为频繁的方法调用提供了高速通道。统一入口 :bits 作为单一入口,集中存储了类的所有元数据,并通过位域技术和掩码进行高效管理,是整个类结构的“总控室”。
Class 结构的设计充满了对性能、灵活性和动态性的深刻考量。理解它是我们构建更稳定、更高效的 iOS
粗糙版 在讲这边文章之前,假设我们都已经掌握了c语言指针知识。并且已经编译好了苹果开源的objc4-756。Xcode调试LLDB
p/x 以16进制打印当前地址
x/4xg 以16进制读取当前对象的首地址向后4位内存地址
一、查看cpp源码 首先我们创建一个工程,声明一个FLYPerson类
1
2
3
4
5
6
7
8
9
10
11
12
13
14
15
16
17
18
#import <Foundation/Foundation.h> NS_ASSUME_NONNULL_BEGIN @interface FLYPerson : NSObject NSString *hobby; } @property (nonatomic , copy ) NSString *nickName;- (void )sayHello; - (void )sayByeBye; - (void )sayGoGo; + (void )sayHappy; @end NS_ASSUME_NONNULL_END
1
2
3
4
5
6
7
8
9
10
11
12
13
14
15
16
17
18
19
20
21
22
23
24
25
#import "FLYPerson.h" @implementation FLYPerson - (void )sayHello { NSLog (@"FLYPerson say : Hello!!!" ); } - (void )sayByeBye { NSLog (@"FLYPerson say : ByeBye!!!" ); } - (void )sayGoGo { NSLog (@"FLYPerson say : GoGo!!!" ); } + (void )sayHappy { NSLog (@"FLYPerson say : Happy!!!" ); } @end
在main函数中我们创建一个对象
1
2
3
4
5
6
7
8
9
10
11
12
13
14
15
16
17
18
#import <Foundation/Foundation.h> #import <objc/runtime.h> #import "FLYPerson.h" int main(int argc, const char * argv[]) { @autoreleasepool { NSLog (@"Hello, World!" ); FLYPerson * person = [[FLYPerson alloc] init]; Class pClass = object_getClass(person); [person sayHello]; [person sayByeBye]; [person sayGoGo]; NSLog (@"%@ - %p" , person, pClass); } return 0 ; }
利用clang编译成cpp源码(先cd到当前文件的目录):
clang -rewrite-objc main.m -o main.cpp
存在UIKit等其他动态引用库时:
xcrun xcode 命令
二、在生成的.cpp源码中查看FLYPerson类 既然我们探究的是类,那就是Class,我们在cpp文件中可以看到:
1 typedef struct objc_class * Class;
这说明,Class其实就是objc_class结构体的指针
1
2
3
struct objc_class { Class _Nonnull isa __attribute__ ((deprecated)); } __attribute__ ((unavailable));
已经注释已经废弃,没有办法了么?还记得我们已经准备好了756的源码,去源码中搜索objc_class,会发现几点重要信息:
三、分析objc_class源码 1、先来了解一下主要的数据结构 看一下objc_class数据结构:
1
2
3
4
5
6
7
8
struct objc_class : objc_object { Class superclass; cache_t cache; class_data_bits_t bits; ... }
看一下内部属性的各自数据结构,这里的// Class ISA; ISA被隐藏了,这是因为objc_class继承自objc_object
1
2
3
struct objc_object { Class _Nonnull isa OBJC_ISA_AVAILABILITY }
注意:
cache_t:(对sel和imp做缓存,这里有一个3/4缓存机制)
1
2
3
4
5
6
struct cache_t { struct bucket_t *_buckets; mask_t _mask; mask_t _occupied; ... }
class_data_bits_t:(这里只有一个属性bits,其中具体的值要转换成data查看,即class_rw_t* data() )
1
2
3
4
5
6
7
8
9
10
11
12
13
14
15
16
17
18
19
20
21
22
23
struct class_data_bits_t { uintptr_t bits; private : ... public : class_rw_t * data () return (class_rw_t *)(bits & FAST_DATA_MASK); } void setData (class_rw_t *newData) { assert (!data () || (newData->flags & (RW_REALIZING | RW_FUTURE))); uintptr_t newBits = (bits & ~FAST_DATA_MASK) | (uintptr_t )newData; atomic_thread_fence (memory_order_release); bits = newBits; } ... }
class_rw_t的数据结构:
1
2
3
4
5
6
7
8
9
10
11
12
13
14
15
16
17
18
19
20
21
22
23
24
25
26
27
28
29
30
31
32
33
34
35
36
37
38
39
40
41
42
struct class_rw_t { uint32_t flags; uint32_t version; const class_ro_t *ro; method_array_t methods; property_array_t properties; protocol_array_t protocols; Class firstSubclass; Class nextSiblingClass; char *demangledName; #if SUPPORT_INDEXED_ISA uint32_t index; #endif void setFlags (uint32_t set) { OSAtomicOr32Barrier (set, &flags); } void clearFlags (uint32_t clear) { OSAtomicXor32Barrier (clear, &flags); } void changeFlags (uint32_t set, uint32_t clear) { assert ((set & clear) == 0 ); uint32_t oldf, newf; do { oldf = flags; newf = (oldf | set) & ~clear; } while (!OSAtomicCompareAndSwap32Barrier (oldf, newf, (volatile int32_t *)&flags)); } };
class_ro_t的数据结构:
1
2
3
4
5
6
7
8
9
10
11
12
13
14
15
16
17
18
19
20
21
22
struct class_ro_t { uint32_t flags; uint32_t instanceStart; uint32_t instanceSize; #ifdef __LP64__ uint32_t reserved; #endif const uint8_t * ivarLayout; const char * name; method_list_t * baseMethodList; protocol_list_t * baseProtocols; const ivar_list_t * ivars; const uint8_t * weakIvarLayout; property_list_t *baseProperties; method_list_t *baseMethods () const return baseMethodList; } };
2、计算objc_class中各属性占用的字节长度 提取出objc_class中的属性:
3、获取类中成员变量、属性和method 此时回到我们main函数:
1
2
3
(lldb) x/4 gx pClass 0 x1000021f8 : 0 x001d8001000021d1 0 x0000000100b37140 0x100002208 : 0 x00000001003da290 0 x0000000000000000
0x1000021f8 偏移8个字节,刚好到superclass的首地址,打印出了superclass
1
2
(lldb) po 0x100002200 <NSObject: 0x100002200 >
利用内存地址偏移,0x100002208 较 0x1000021f8 刚好偏移16位,刚好指向objc_class中的cache的首地址
1
2
(lldb) po 0x100002208 4294976008
打印cache的首地址,发现是一串数字,因为cache是结构体,内部有多个值,进行了内存对齐,所以打印出来的是多个值的组合,先过滤,最后进行摸索,由于cache是16位,从cache首地址偏移16位,就能到达bits首地址
1
2
3
4
5
6
(lldb) po 0x100002218 objc[14430 ]: Attempt to use unknown class 0 x101e09dd0. 4294976024 (lldb) p 0x100002218 (long) $5 = 4294976024
两种方式均报错了,尝试强转(因为已经不是oc中对象类型,以下都是用p来打印)
1
2
(lldb) p (class_data_bits_t *)0x100002218 (class_data_bits_t *) $7 = 0x0000000100002218
此时用到class_data_bits_t中的方法(此方法是通过掩码的方式,将数据获取出来,FAST_DATA_MASK是掩码)
1
2
3
class_rw_t * data () { return (class_rw_t *)(bits & FAST_DATA_MASK ); }
继续获取:
1
2
3
4
5
6
7
8
9
10
11
12
13
14
15
16
17
18
19
20
21
22
23
24
25
26
27
28
29
30
31
32
33
34
35
36
37
(lldb) p $7 ->data () (class_rw_t *) $9 = 0x0000000101e09dd0 (lldb) p *$9 (class_rw_t ) $10 = { flags = 2148139008 version = 0 ro = 0x0000000100002170 methods = { list_array_tt<method_t , method_list_t > = { = { list = 0x00000001000020a8 arrayAndFlag = 4294975656 } } } properties = { list_array_tt<property_t , property_list_t > = { = { list = 0x0000000100002158 arrayAndFlag = 4294975832 } } } protocols = { list_array_tt<unsigned long , protocol_list_t > = { = { list = 0x0000000000000000 arrayAndFlag = 0 } } } firstSubclass = nil nextSiblingClass = NSUUID demangledName = 0x0000000000000000 }
继续
1 2 3 4 5 6 7 8 9 10 11 12 13 14 15 16 (lldb) p $10 .ro (const class_ro_t *) $11 = 0x0000000100002170 (lldb) p *$11 (const class_ro_t) $12 = { flags = 388 instanceStart = 8 instanceSize = 24 reserved = 0 ivarLayout = 0x0000000100000f45 "\x02" name = 0x0000000100000f3b "FLYPerson" baseMethodList = 0x00000001000020a8 baseProtocols = 0x0000000000000000 ivars = 0x0000000100002110 weakIvarLayout = 0x0000000000000000 baseProperties = 0x0000000100002158 }
属性:
1
2
3
4
5
6
7
8
9
10
(lldb) p $12 .baseProperties (property_list_t *const) $13 = 0x0000000100002158 (lldb) p *$13 (property_list_t) $14 = { entsize_list_tt<property_t, property_list_t, 0 > = { entsizeAndFlags = 16 count = 1 first = (name = "nickName" , attributes = "T@\" NSString\",C,N,V_nickName" ) } }
成员变量:
1
2
3
4
5
6
7
8
9
10
11
12
13
14
15
16
(lldb) p $12. ivars (const ivar_list_t *const ) $15 = 0x0000000100002110 (lldb) p *$15 (const ivar_list_t ) $16 = { entsize_list_tt<ivar_t , ivar_list_t , 0 > = { entsizeAndFlags = 32 count = 2 first = { offset = 0x00000001000021c0 name = 0x0000000100000f7d "hobby" type = 0x0000000100000fa8 "@\"NSString\"" alignment_raw = 3 size = 8 } } }
方法列表:
1
2
3
4
5
6
7
8
9
10
11
12
13
14
(lldb) p $12 .baseMethodList (method_list_t *const) $17 = 0x00000001000020a8 (lldb) p *$17 (method_list_t) $18 = { entsize_list_tt<method_t, method_list_t, 3 > = { entsizeAndFlags = 26 count = 4 first = { name = "sayHello" types = 0x0000000100000f8d "v16@0:8" imp = 0x0000000100000c90 (FLYTest`-[FLYPerson sayHello] at FLYPerson.m:12 ) } } }
count = 4 说明有4个方法,让我们一一打印(get是结构体中的函数,可去结构体中查看)
1
2
3
4
5
6
7
8
9
10
11
12
13
14
15
16
17
18
19
20
21
22
23
24
(lldb) p $18 .get (0 ) (method_t) $19 = { name = "sayHello" types = 0x0000000100000f8d "v16@0:8" imp = 0x0000000100000c90 (FLYTest`-[FLYPerson sayHello] at FLYPerson.m:12 ) } (lldb) p $18 .get (1 ) (method_t) $20 = { name = ".cxx_destruct" types = 0x0000000100000f8d "v16@0:8" imp = 0x0000000100000d60 (FLYTest`-[FLYPerson .cxx_destruct] at FLYPerson.m:10 ) } (lldb) p $18 .get (2 ) (method_t) $21 = { name = "setNickName:" types = 0x0000000100000f9d "v24@0:8@16" imp = 0x0000000100000d20 (FLYTest`-[FLYPerson setNickName:] at FLYPerson.h:16 ) } (lldb) p $18 .get (3 ) (method_t) $22 = { name = "nickName" types = 0x0000000100000f95 "@16@0:8" imp = 0x0000000100000cf0 (FLYTest`-[FLYPerson nickName] at FLYPerson.h:16 ) }
以上并没有类方法,因为类方法是存放在元类中的,让我们来获取该类的ISA,即该类的元类
1
2
3
4
5
6
7
8
9
10
11
12
13
14
15
16
17
18
19
20
21
22
23
24
25
26
27
28
29
30
31
32
33
34
35
36
37
38
39
40
41
42
43
44
45
46
47
48
49
50
51
52
53
(lldb) x/4 xg pClass 0 x1000021f8 : 0 x001d8001000021d1 0 x0000000100b37140 0x100002208 : 0 x00000001003da290 0 x0000000000000000 (lldb) po 0 x001d8001000021d1 & 0 x00007ffffffffff8 FLYPerson (lldb) p/x 0 x001d8001000021d1 & 0 x00007ffffffffff8 (long) $3 = 0 x00000001000021d0 (lldb) x/4 gx 0 x00000001000021d0 0 x1000021d0 : 0 x001d800100b370f1 0 x0000000100b370f0 0 x1000021e0 : 0 x000000010112bcb0 0 x0000000100000003 (lldb) p (class_data_bits_t *)0 x1000021f0 (class_data_bits_t *) $5 = 0 x00000001000021f0 (lldb) p $5 ->data() (class_rw_t *) $7 = 0 x0000000101111ac0 (lldb) p $7 ->ro (const class_ro_t *) $8 = 0 x0000000100002060 (lldb) p *$8 (const class_ro_t) $9 = { flags = 389 instanceStart = 40 instanceSize = 40 reserved = 0 ivarLayout = 0 x0000000000000000 name = 0 x0000000100000f3b "FLYPerson" baseMethodList = 0 x0000000100002040 baseProtocols = 0 x0000000000000000 ivars = 0 x0000000000000000 weakIvarLayout = 0 x0000000000000000 baseProperties = 0 x0000000000000000 } (lldb) p $9 .baseMethodList (method_list_t *const) $11 = 0 x0000000100002040 (lldb) p *$11 (method_list_t) $12 = { entsize_list_tt<method_t, method_list_t, 3 > = { entsizeAndFlags = 26 count = 1 first = { name = "sayHappy" types = 0 x0000000100000f8d "v16@0 :8 " imp = 0 x0000000100000cc0 (FLYTest`+[FLYPerson sayHappy] at FLYPerson.m:16 ) } } }
经过一顿操作之后,又回到了上述的地方(至于0x00007ffffffffff8怎么来的,会在另一篇文章中指出)
小结:
method_array_t methods;
property_array_t properties;
protocol_array_t protocols;
还不清楚这三个属性的作用,有时间补充
4、探索cache的原理 看一下cache_t完整的结构体
1
2
3
4
5
6
7
8
9
10
11
12
13
14
15
16
17
18
19
20
21
22
23
24
25
26
struct cache_t { struct bucket_t *_buckets; mask_t _mask; mask_t _occupied; public : struct bucket_t *buckets (); mask_t mask () mask_t occupied () void incrementOccupied () void setBucketsAndMask (struct bucket_t *newBuckets, mask_t newMask) void initializeToEmpty () mask_t capacity () bool isConstantEmptyCache () bool canBeFreed () static size_t bytesForCapacity (uint32_t cap) static struct bucket_t * endMarker (struct bucket_t *b, uint32_t cap); void expand () void reallocate (mask_t oldCapacity, mask_t newCapacity) struct bucket_t * find (cache_key_t key, id receiver); static void bad_cache (id receiver, SEL sel, Class isa) __attribute__ ((noreturn)) };
bucket_t的结构:
1
2
3
4
5
6
7
8
9
10
11
12
13
14
15
16
17
18
19
20
struct bucket_t {private : #if __arm64__ MethodCacheIMP _imp; cache_key_t _key; #else cache_key_t _key; MethodCacheIMP _imp; #endif public : inline cache_key_t key () const return _key; } inline IMP imp () const return (IMP)_imp; } inline void setKey (cache_key_t newKey) inline void setImp (IMP newImp) void set (cache_key_t newKey, IMP newImp) };
可见,sel和imp都是存在bucket_t中。
1
2
3
4
5
6
7
8
9
10
11
12
13
14
15
16
17
18
19
20
21
22
23
24
25
26
27
28
29
(lldb) x person 0x102100020: 4d 22 00 00 01 80 1d 00 00 00 00 00 00 00 00 00 M".............. 0x102100030: 00 00 00 00 00 00 00 00 00 00 00 00 00 00 00 00 ................ (lldb) p (cache_t *)0x102100030 (cache_t *) $1 = 0x0000000102100030 (lldb) p *$1 (cache_t) $2 = { _buckets = 0x0000000000000000 _mask = 0 _occupied = 0 } (lldb) x pClass 0x100002248: 21 22 00 00 01 80 1d 00 40 71 b3 00 01 00 00 00 !"......@q...... 0x100002258: 80 01 10 02 01 00 00 00 03 00 00 00 03 00 00 00 ................ (lldb) p (cache_t *)0x100002258 (cache_t *) $4 = 0x0000000100002258 (lldb) p *$4 (cache_t) $5 = { _buckets = 0x0000000102100180 _mask = 3 _occupied = 3 } (lldb) p $5._buckets (bucket_t *) $6 = 0x0000000102100180 (lldb) p *$6 (bucket_t) $7 = { _key = 4294971196 _imp = 0x0000000100000ba0 (FLYTest`-[FLYPerson sayHello] at FLYPerson.m:12) }
可以看到,我们先获取person的cache_t,发现内部的值都是空值,又来获取其Class的cache_t,发现是有值的,得出结论,对象的方法列表缓存是存在其类对象中(其实就是对象的ISA中,因为对象的元类就是其Class)。
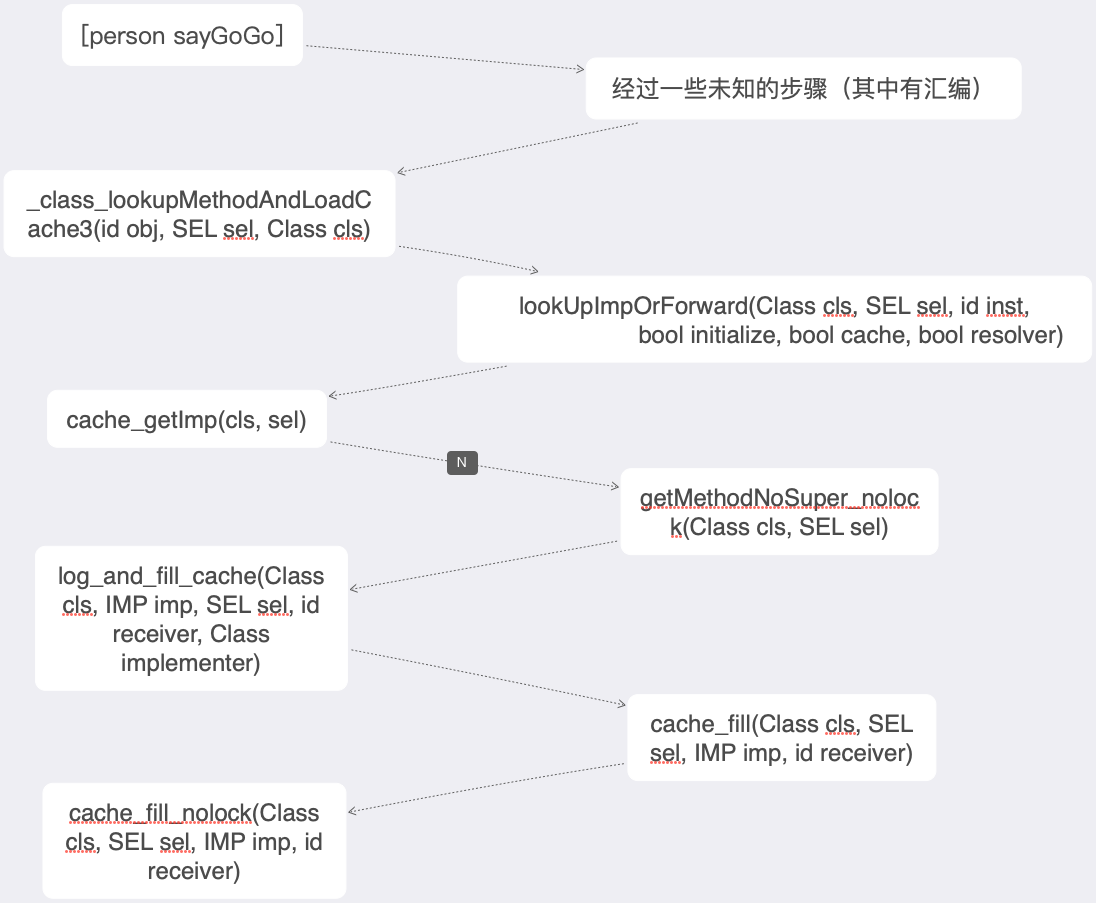
经过诸多尝试,我们发现,对象在调用方法的时候,执行的步骤大概如下:
1
2
3
4
5
6
7
8
9
10
11
12
13
14
15
16
17
18
19
20
21
22
23
24
25
26
27
28
29
30
31
32
33
34
35
36
static void cache_fill_nolock(Class cls, SEL sel, IMP imp, id receiver) { cacheUpdateLock.assertLocked(); if (!cls-> if (cache_getImp(cls, sel)) return; cache_t *cache = getCache(cls); cache_key_t key = getKey(sel); mask_t newOccupied = cache->1 ; mask_t capacity = cache-> if (cache-> cache -> } else if (newOccupied <= capacity / 4 * 3 ) { } else { cache -> } bucket_t *bucket = cache-> if (bucket->key () == 0) cache-> bucket -> }
1
2
3
4
5
6
7
8
9
10
11
cache_t *getCache (Class cls) { assert (cls); return &cls->cache; } cache_key_t getKey (SEL sel) { assert (sel); return (cache_key_t)sel; }
以上两个方法没什么好说的,一个获取cache,一个获取sel的key,这里是把(char类型)sel转成了unsigned long,因为数字比char容易处理,且速度快。
1
2
3
4
mask_t cache_t::capacity () { return mask () ? mask ()+1 : 0 ; }
capacity 获取新的容量,在原基础上+1。
cache->reallocate方法:
1
2
3
4
5
6
7
8
9
10
11
12
13
14
15
16
17
18
19
20
21
void cache_t::reallocate (mask_t oldCapacity, mask_t newCapacity) bool freeOld = canBeFreed (); bucket_t *oldBuckets = buckets (); bucket_t *newBuckets = allocateBuckets (newCapacity); assert (newCapacity > 0 ); assert ((uintptr_t )(mask_t )(newCapacity-1 ) == newCapacity-1 ); setBucketsAndMask (newBuckets, newCapacity - 1 ); if (freeOld) { cache_collect_free (oldBuckets, oldCapacity); cache_collect (false ); } }
reallocate方法,开辟新空间,会把原来的内存都释放掉,也就是会把原来缓存的内容全部清除掉。
cache->expand方法:
1
2
3
4
5
6
7
8
9
10
11
12
13
14
15
void cache_t::expand () cacheUpdateLock.assertLocked (); uint32_t oldCapacity = capacity (); uint32_t newCapacity = oldCapacity ? oldCapacity*2 : INIT_CACHE_SIZE; if ((uint32_t )(mask_t )newCapacity != newCapacity) { newCapacity = oldCapacity; } reallocate (oldCapacity, newCapacity); }
expand是扩容方法,从代码中可以得知,如果原来的容量是0,则创建为4的新容量,如果不是0,则扩展为原来的两倍。扩容的时候会在最后一位插入key为1,值根据不同设备存不同的值。容量设置为4-1或者两倍-1。
1
2
3
4
5
6
7
8
9
10
11
12
13
14
15
16
17
18
bucket_t * cache_t::find (cache_key_t k, id receiver) assert (k != 0 ); bucket_t *b = buckets (); mask_t m = mask (); mask_t begin = cache_hash (k, m); mask_t i = begin; do { if (b[i].key () == 0 || b[i].key () == k) { return &b[i]; } } while ((i = cache_next (i, m)) != begin); Class cls = (Class)((uintptr_t )this - offsetof (objc_class, cache)); cache_t ::bad_cache (receiver, (SEL)k, cls); }
find方法找到对应当前sel的bucket,如果找不到获取一个空的bucket,如果没有空的则报错。这里其实有一个算法,所以每次遍历并不是从0开始的,所以每次缓存方法的时候的位置不是依次存储的,而是根据该算法有关。
小结:
四、最后 以上只是一个读取类的数据结构的思路,这里主要是经过了内存地址读取,内存偏移,分析结构体等等,重要的是思路和过程,当然结果也重要,毕竟可以吹一波了!